
MS Project scheduling for beginners: start date and calendar, auto vs manual tasks, outline, links, milestones, baseline, views and a worked block plan.
Most planners start their scheduling life in Excel, and Excel genuinely works for a simple task list. It stops working the moment a schedule needs real dependencies, automatic date recalculation or more than a few hundred rows, which describes almost every newbuild schedule by the time steel cutting starts. This lesson is a practical first walkthrough of Microsoft Project for planners making that jump.
It covers how MS Project works out dates, the order in which to set up a new plan, the fields and views you will use first, and a small worked example: an illustrative ten-task block plan, scheduled the way MS Project would schedule it. Menu paths refer to Project desktop (Project Standard and Professional 2016 to 2024, and the Project Online desktop client), as documented on Microsoft Support.
Why MS Project Instead of Excel
The core difference is that MS Project treats dependencies as real relationships, not as dates you typed in. Change a predecessor's duration and every dependent task recalculates its dates. In Excel you would have to find and fix every affected row by hand, and on a schedule with thousands of rows that is not realistic to do reliably. Project also understands calendars, milestones, resources and the critical path natively, all of which Excel can only approximate with manual formulas.
How MS Project Schedules a Task
It helps to know what the scheduling engine actually does before entering anything, because almost every beginner surprise comes from fighting it.
For an automatically scheduled task, Microsoft describes Project as setting the dates from dependencies, constraints, calendars and other factors. In practice that means the planner supplies four things and Project calculates the rest:
- A project start date. When a project is scheduled from its start date (the default), Project calculates the finish date from it and new tasks get the As Soon As Possible constraint.
- A calendar. Durations are counted in working time on the project calendar, so a 5-day task that starts on a Thursday finishes the following Wednesday on a Monday to Friday calendar.
- Durations. How long each task takes, in working time.
- Links. Which task waits for which, entered as predecessors.
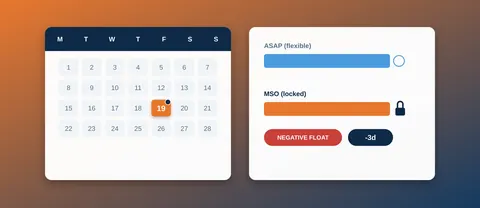
From those, Project pushes every task as early as its predecessors and the calendar allow, and the project finish date falls out at the end. The dates in the Start and Finish columns are results, not inputs. If you type a start date into an automatically scheduled task, Microsoft notes that Project quietly adds a Start No Earlier Than constraint with your date, and that task stops responding to its predecessors moving earlier. The Task Constraints lesson covers why that matters.
Manually scheduled tasks behave differently: Project keeps the start, finish and duration you entered and, in Microsoft's words, will never change the dates of a manually scheduled task. That is the setting to watch for in the next section.
Setting Up a New Plan: a Working Order
The order below is not the only one that works, but it avoids the most common rework: entering a hundred tasks and then discovering they were all manually scheduled, or that the calendar had no holidays in it.
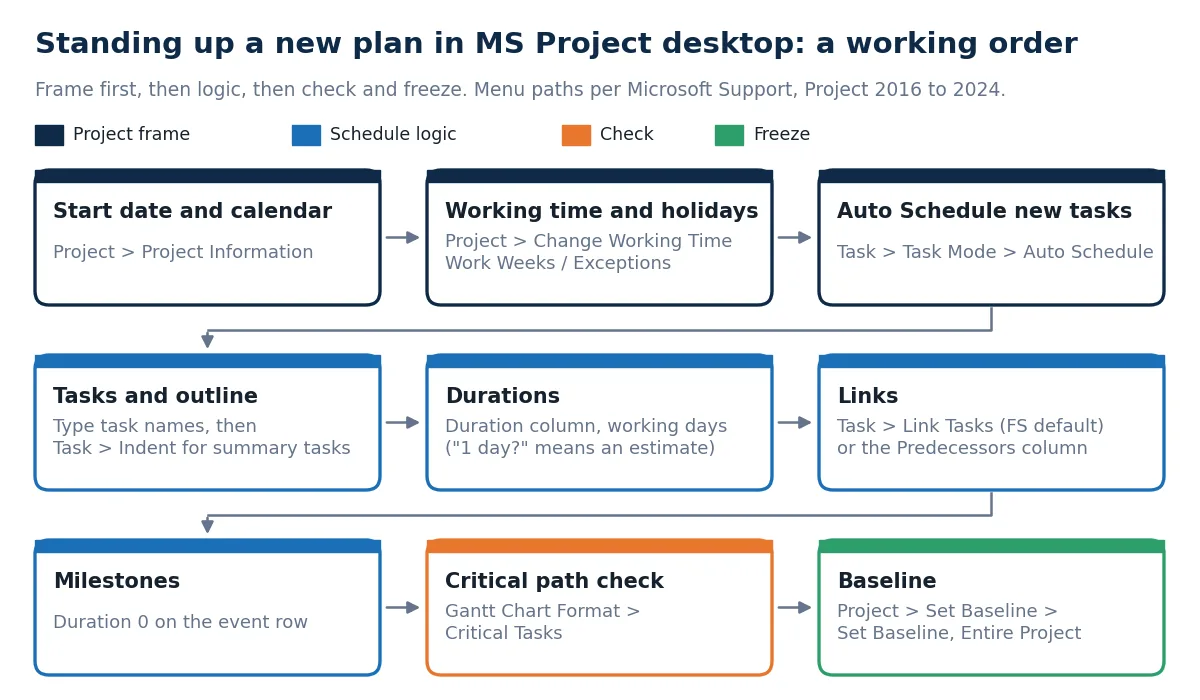
Start date and calendar
Open Project > Project Information. The dialog holds the project start date, the Schedule from setting (project start date by default, or project finish date) and the Calendar list, which sets the base calendar used as the project calendar. Project ships with three base calendars: Standard, 24 Hours and Night Shift.
Then open Project > Change Working Time to make that calendar match reality:
- The Work Weeks tab sets the normal working days and hours. Microsoft's guidance is to use Details on this tab for the regular pattern and not to enter holidays here.
- The Exceptions tab is for holidays and other non-working days. Project does not include preset holidays, so a new plan has none until you add them. A recurring holiday can be given a recurrence pattern through Details.
The number of hours in a "day" is a separate setting: File > Options > Schedule holds the hours per day that Project uses to convert a duration typed in days into hours. If the yard's working day is not 8 hours, keep this setting consistent with the calendar. MPUG's guidance on workdays recommends testing such changes on a small project before applying them to a live schedule.
On a shipyard plan, a common approach is to set the project calendar to the normal working pattern and enter public holidays and planned shutdown periods as exceptions, using a list confirmed with production or HR before it goes in. Every exception moves dates, so it pays to get the list right once. Work that runs on a different pattern, such as a second shift or round-the-clock dock work, needs more than one calendar and is a topic of its own; for a first plan, one accurate project calendar is enough.
Auto Scheduled vs Manually Scheduled
This is the single most common beginner trap. Microsoft's Task Mode documentation states that new tasks are manually scheduled by default. A manually scheduled task sits at whatever dates you typed, silently disconnected from the logic of the rest of the network, so the dependencies you set up later will not move it.
Before entering tasks, switch the default for the plan: on the Task tab, in the Schedule group, choose Task Mode and then Auto Schedule. New tasks in that project are then automatically scheduled. For tasks already entered, check the Task Mode column (adding it to the Gantt sheet makes manual tasks easy to spot) and set them to Auto Scheduled.
Tasks and the outline
Type task names down the Task Name column. Keep them specific enough to be useful in a filtered view: "Erect Block 14, Zone C" beats "Erection".
To group tasks, select the ones that belong under a heading and choose Task > Indent. The row above becomes a summary task and the indented rows become its subtasks; Outdent moves a task back up a level. View > Outline shows the schedule at a chosen level. Three points from Microsoft's documentation are worth knowing on day one:
- Summary tasks roll up their subtasks: work and cost are totals, but duration is not. The summary bar spans its subtasks from the first start to the last finish, so summary figures do not always add up the way you might expect.
- Summary tasks create structure, not dependencies. Indenting tasks under a heading does not link them.
- Microsoft advises against assigning resources to summary tasks. Assign them to subtasks, or overallocations can become impossible to resolve.
A habit carried over from the original version of this lesson: number and structure the outline by block or zone, not only by discipline. It makes it far easier to filter "everything happening on Block 14" when you need to check production readiness for one area. The newbuild WBS lesson covers how to build that breakdown.
Durations
Enter durations in the Duration column. Days are the default unit. On an automatically scheduled task, a new row starts at an estimated one day, shown with a question mark ("1 day?"); the question mark marks the duration as an estimate and disappears once you enter your own value. You can filter on estimated durations later to find tasks nobody has sized yet.
Durations are working time. A curing or settling period that runs through nights and weekends can be entered as an elapsed duration instead (for example 3ed), which the Task Types lesson explains alongside the difference between duration and work.
Links
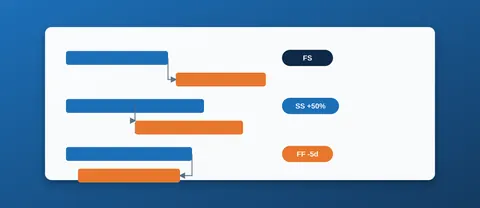
Select two tasks (hold Ctrl to pick them) and choose Task > Link Tasks in the Schedule group. The default link is Finish-to-Start: the predecessor finishes, then the successor starts. Faster for long lists is the Predecessors column, where you type the ID of the predecessor task. A plain ID means Finish-to-Start with no lag; add a type and a lag for anything else, for example 14FS+3d (start three days after task 14 finishes) or 24SS+5d (start five days after task 24 starts). A negative lag is a lead, which overlaps the tasks.
Build the dependency chain deliberately, task by task, rather than typing dates into Start and Finish. Typed dates turn into constraints, as described above, which defeats the point of using MS Project over Excel. All four link types (FS, SS, FF, SF) and when each fits a shipyard sequence are covered in Task Dependencies in MS Project.
Milestones
A task with a duration of 0 is automatically a milestone, and Project draws it as a milestone symbol rather than a bar. Contract signature, steel cutting, keel laying, launch and delivery all belong here, and so do internal hand-overs such as "block ready for erection". A milestone that needs a duration (an approval window, for instance) can be marked as one on the Advanced tab of Task Information with Mark task as milestone; it then appears on its last day without a bar.
Give milestones their own predecessors, so that a slip upstream moves the milestone's forecast date automatically. A consistent naming pattern, such as starting every milestone name with "MS," also makes them easy to filter and report separately from regular tasks.
Check the critical path
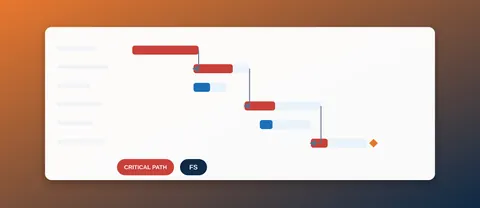
Once tasks are linked, turn on the critical path straight away: in the Gantt Chart view, on the Gantt Chart Format tab, select Critical Tasks. Critical tasks are drawn in red. MS Project marks a task as critical when its total slack is at or below a threshold, which is 0 days by default and can be changed under File > Options > Advanced ("Tasks are critical if slack is less than or equal to").
This is the fastest sanity check of the logic you just built. A critical path that runs through tasks you know are not driving the job, or one that breaks off part way, usually points to a missing or wrong link, a typed date, or a task that is still manually scheduled. The CPM lesson explains the forward and backward pass behind these numbers.
Set a baseline
When the schedule is approved, save a baseline: Project > Set Baseline > Set Baseline, choose Entire Project, and save the file. A baseline is a snapshot of the plan that later progress is compared against. Project can hold up to 11 baseline sets (Baseline plus Baseline 1 to 10), so an approved re-plan can go into a numbered baseline without overwriting the original. Avoid quietly overwriting the first one: its whole value is showing how far the live schedule has moved from the plan you started with. Tracking progress against the baseline is covered in Getting Started with MS Project for Shipbuilding Schedules.
The Core Fields You'll Actually Use
MS Project offers dozens of columns, but a newbuild schedule needs only a handful of them day to day.
| Field | What it holds | Practical note |
|---|---|---|
| Task Name | What the task is | Specific enough to read in a filtered view ("Erect Block 14, Zone C") |
| Task Mode | Manually or automatically scheduled | Should read Auto Scheduled for anything driven by logic |
| Duration | Working time from start to finish | Be consistent about which activities count weekends (elapsed durations) |
| Start / Finish | Calculated dates | Normally calculated from links, not typed |
| Predecessors | Task IDs with link type and lag | The column that actually drives the schedule: 24FS, 24SS+5d |
| % Complete | Progress on the task | Update against physical progress, not against elapsed calendar time |
| Resource Names | Who or what does the work | Even a simple label per trade or shop helps filtering before full resource loading |
Worked Example: an Illustrative Ten-Task Block Plan
The plan below is an illustrative example, made up for this lesson to show how MS Project turns durations and links into dates. The task list, durations and links are not yard data and are not a recommended sequence for any real block.
One summary task holds ten working tasks and milestones. The project starts on Monday 1 March 2027 on a Monday to Friday calendar with no holidays entered.
| ID | Task | Duration | Predecessors |
|---|---|---|---|
| 1 | Block B12 (illustrative), summary task | 24 days (rolled up) | |
| 2 | Steel for block available | 0 days | |
| 3 | Plate cutting | 4 days | 2 |
| 4 | Profile cutting | 3 days | 2 |
| 5 | Flat panel assembly | 5 days | 3 |
| 6 | Web frame sub-assembly | 4 days | 4 |
| 7 | Block assembly and welding | 8 days | 5, 6 |
| 8 | Block pre-outfitting | 5 days | 7SS+3d |
| 9 | Dimensional check and inspection | 1 day | 7, 8 |
| 10 | Blasting and painting | 4 days | 9 |
| 11 | Block ready for erection | 0 days | 10 |
| 12 | Block erection on berth | 2 days | 11 |
Entered with Auto Schedule on, the Predecessors column is all the logic Project needs. Every link is Finish-to-Start except task 8, which starts three working days after block assembly starts, so pre-outfitting overlaps the welding instead of waiting for it to finish. Tasks 2 and 11 have zero duration, so they are milestones.
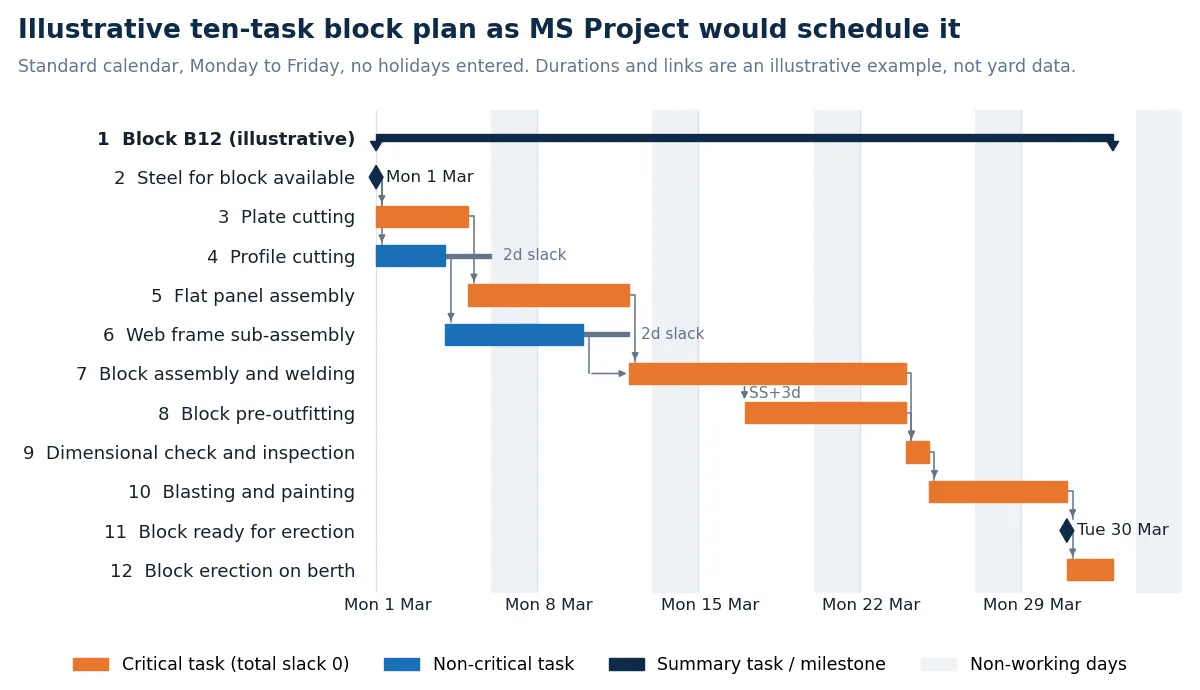
These are the dates and slack values the forward and backward pass produce, which is what MS Project shows in the Start, Finish and Total Slack columns:
| ID | Task | Start | Finish | Total slack | Critical |
|---|---|---|---|---|---|
| 2 | Steel for block available | Mon 1 Mar | Mon 1 Mar | 0 days | Yes |
| 3 | Plate cutting | Mon 1 Mar | Thu 4 Mar | 0 days | Yes |
| 4 | Profile cutting | Mon 1 Mar | Wed 3 Mar | 2 days | No |
| 5 | Flat panel assembly | Fri 5 Mar | Thu 11 Mar | 0 days | Yes |
| 6 | Web frame sub-assembly | Thu 4 Mar | Tue 9 Mar | 2 days | No |
| 7 | Block assembly and welding | Fri 12 Mar | Tue 23 Mar | 0 days | Yes |
| 8 | Block pre-outfitting | Wed 17 Mar | Tue 23 Mar | 0 days | Yes |
| 9 | Dimensional check and inspection | Wed 24 Mar | Wed 24 Mar | 0 days | Yes |
| 10 | Blasting and painting | Thu 25 Mar | Tue 30 Mar | 0 days | Yes |
| 11 | Block ready for erection | Tue 30 Mar | Tue 30 Mar | 0 days | Yes |
| 12 | Block erection on berth | Wed 31 Mar | Thu 1 Apr | 0 days | Yes |
What the example shows:
- Two paths feed block assembly. Plates (4 + 5 days) take longer than profiles (3 + 4 days), so the plate path is critical and the profile path has 2 days of total slack. A two-day slip on profile cutting would not move the block; a three-day slip would.
- Weekends are skipped, not counted. Flat panel assembly starts on a Friday and runs five working days to the following Thursday.
- The SS link overlaps work. Pre-outfitting starts on Wednesday 17 March, three working days into block assembly, and both finish on Tuesday 23 March. Change its lag to
+4dand pre-outfitting finishes a day after the welding, which pushes the inspection, the painting and the erection date by one day. - The summary bar is a span, not a sum. Block B12 runs 24 working days, from 1 March to 1 April, even though its subtasks add up to far more than that.
- The milestone sits on its predecessor's finish. "Block ready for erection" shows Tuesday 30 March, the day painting finishes, and erection starts the next working day.
Try changing one duration at a time in a practice file and watch which dates move. It is the quickest way to get a feel for the scheduling engine.
The Four Views to Learn First
A view is a way of looking at the same project data. Microsoft groups views into task views, resource views and assignment views; you switch between them on the View tab, in the Task Views and Resource Views groups.
| View | What it shows | Use it for |
|---|---|---|
| Gantt Chart | A task sheet on the left and bars on a timescale on the right. The default view when you open Project | Entering tasks, durations and links; reading the schedule day to day |
| Task Usage | Each task with its assigned resources indented underneath, and work or cost per day or week on the timescale | Checking how many hours a task puts on each trade, week by week |
| Resource Sheet | A spreadsheet-style list for entering and reviewing resource information | Setting up the trades, shops or crews before assigning them |
| Network Diagram | Tasks as boxes and dependencies as lines between them | Reviewing the logic itself, especially where links are hard to follow on a Gantt bar chart |
Two more are worth knowing early. The Tracking Gantt draws two bars per task, the baseline and the current schedule, which makes slippage visible once a baseline exists. Resource Usage turns the Task Usage view around: each resource with its tasks underneath, which is where overallocations show up in red.
MS Project Terms in Plain Language
| Term | Meaning in MS Project |
|---|---|
| Duration | The span of active working time for a task, from its start to its finish. Non-working time on the calendar is not counted |
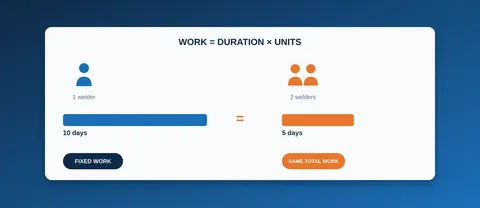
| Work | The total hours of effort scheduled for all resources assigned to a task. Not the same as duration: two people on a 5-day task is 80 hours of work on an 8-hour day |
| Predecessor | A task that must start or finish before the current task can start or finish. The Predecessors column lists task IDs with the link type and any lag, for example 14FS+3d |
| Lag (and lead) | A delay added to a link: positive lag delays the successor, negative lag (lead) lets it overlap the predecessor. Entered in days or as a percentage |
| Total Slack | How long a task's finish can slip before it delays the project finish. Negative slack means not enough time has been scheduled, usually because of a date constraint |
| Critical task | A task whose total slack is at or below the critical threshold (0 days by default). A chain of critical tasks drives the finish date |
| Milestone | A marker for an event. Any task with zero duration is a milestone; a task with duration can also be marked as one |
| Summary task | A heading task created by indenting tasks under it. It rolls up its subtasks and does not link them |
| Task Mode | Whether Project schedules the task (Auto Scheduled) or keeps the dates you typed (Manually Scheduled) |
| Baseline | A saved snapshot of the schedule used to measure later progress. Up to 11 can be stored per project |
Common Beginner Mistakes
- Leaving tasks manually scheduled. Links appear to do nothing because manual tasks keep their typed dates. Check the Task Mode column first when a date refuses to move.
- Typing dates instead of linking. Every typed start date on an automatically scheduled task becomes a Start No Earlier Than constraint, and the schedule stops responding to earlier progress.
- Skipping the calendar. Without holidays and shutdowns entered, every date after them is optimistic by exactly that many days.
- Expecting the outline to create logic. Indenting tasks under a summary task groups them; it does not link them. Tasks without predecessors simply start on the project start date.
- Assigning resources to summary tasks. Assign trades and crews to the subtasks that do the work.
- Giving milestones a duration by accident. A one-day "Launch" task is a bar, not a milestone, and it will not filter or report as a milestone unless it is marked as one.
- Overwriting the original baseline. Save re-plans into Baseline 1 to 10 and keep the first one as the reference.
Where to Go Next
This lesson is the first in the MS Project series. The lessons below each take one part of it further:
| Lesson | What it adds |
|---|---|
| Task Dependencies in MS Project: FS, SS, FF, SF and Lag/Lead Time | All four link types, lag and lead, and how to enter them |
| Task Constraints in MS Project: ASAP, ALAP and Date-Driven Constraints | How a pinned date can override the logic you just built |
| Task Types and Effort-Driven Scheduling | Why adding a second person to a task sometimes changes nothing at all |
| Critical Path Method (CPM) Scheduling for Shipbuilding | The forward and backward pass, total and free float |
| Creating a Project Schedule from Scratch in Your Browser | Drafting a schedule without an MS Project licence and exporting it as MS Project XML |
If a yard or subcontractor sends you an .mpp file and you do not have Microsoft Project, the free MPP viewer opens it in the browser for reading. Building and changing the schedule itself is done in Microsoft Project.
Frequently Asked Questions
Why don't my MS Project tasks move when I change a predecessor?
The tasks are most likely manually scheduled, which Microsoft states is the default for new tasks. Manually scheduled tasks keep the dates you typed. Set the Task Mode of those tasks to Auto Scheduled, and set Task > Task Mode > Auto Schedule so new tasks start that way. See Microsoft Support: Task Mode (task field).
How do I show the critical path in MS Project?
In the Gantt Chart view, go to the Gantt Chart Format tab and select Critical Tasks; critical tasks are then drawn in red. A task counts as critical when its total slack is at or below the threshold in File > Options > Advanced, 0 days by default. See Microsoft Support: Show the critical path of your project in Project.
How many baselines can MS Project save?
Up to 11 per project: the unnumbered Baseline plus Baseline 1 to Baseline 10. Set one with Project > Set Baseline > Set Baseline; it is saved with the project file. See Microsoft Support: Set and save a baseline.